Friday, November 11, 2011

Sweet Potatoes - Sweet Treats

Hi everyone....I'm a little late with my post this week...my husband had back surgery two weeks ago so things have been a "little" hectic.
Last week my friend and neighbor Lori Ellis gave me some sweet potatoes from her garden.  They are so sweet and delicious compared to the store bought ones.  I used two with dinner last night....mashed them with butter and served them with our Salmon fillets.
Then last evening I got this idea to make some Sweet Potato Muffins with the remaining ones.  So this morning I wrote a recipe for them and set out putting them together.  Wanted to see if they were good enough to share the recipe with you.  Of course, I thought so...Tee Hee...but then my husband tried one, and he said they were really good!  I will apologize for not having a photo tutorial this time.  I will do one next time I make them, which I am sure will be soon with Thanksgiving around the corner.  Here's my recipe:


Bake @ 350 degrees for 28 - 30 minutes.  (or until tester comes out clean)
Recipes makes 6 jumbo muffins.

Whisk together the following dry ingredients  in a medium bowl and set aside.
2 cups flour
2/3 cups granulated sugar
1/4 tsp. baking soda
1 1/2 tsp. baking powder
1/2 tsp. salt
1 tsp. cinnamon
1/2 tsp. nutmeg

In larger bowl combine until smooth ( I used my immersible hand blender for this)
1 egg
1 stick unsalted butter (softened)
1 tsp. vanilla extract
1 tsp. fresh lemon juice
1/3 cup buttermilk
1 1/2 cups cooked and peeled sweet potatoes

To this add the dry ingredients and mix just until  moistened.

Topping:
1 Tbsp. flour
1/4 cup brown sugar
1/4 cup chopped pecans

Mix together and sprinkle each muffin with heaping tablespoon of topping, and enjoy!


I hope you enjoy them as much as we did!  Happy Baking!

Until next time,  Love and Hugs

Wednesday, November 2, 2011

Birthday Board - Never Forget Another Birthday

Have you ever been embarrassed by forgetting a birthday in your family?  Boy I have!  Talk about having a red face and feeling about an inch high.  Tee Hee  Keeping track of all the birthdays makes my brain crazy sometimes. I believe I have found the perfect solution to that dilemma. I ran across this really great idea at The Idea Door  the other day for keeping me on track with family birthdays.  We have 17 great-grandchildren, 8 grandchildren, and 5 children; plus all the cousins and nieces and nephews so this project is perfect for us. 

It's a Birthday Board.....and here is how I made mine.

Materials Needed:
foam board
1/2 yard fabric
embellishments
ribbon 
card stock (variety of colors)
Aleen's Clear Gel Tacky Glue

Tools Needed:
punches -  in your desired shape
exacto knife
scissors
ruler 
chalk pencil or chalk

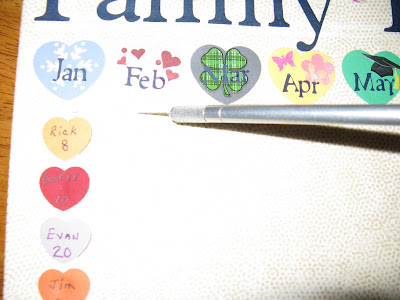
I started by cutting a 12"x 20" foam board.  I then covered it with fabric affixing it with the clear glue as shown in picture below.


I decided to use hearts shapes for the months and birthdays because I am all about love and family, and all things of the heart <3 .  I used a 1-1/2" heart punch for the months and a 1/2" punch for the individual birthdays below each month. 


Then I embellished each month with things that pertain to  that  particular month,  for example:  I used a pumpkin and a black  cat for October.


I used my Cricut Machine to cut the title lettering for the board.  I used 2" letters.  Before placing the letters,  I  made a chalk line so   that my lettering would be level across board.  I titled my board Family Birthdays.


After I cut all the letters and shapes I glued them to the board using the clear glue.


 I used ribbon to glue the individual hearts with names and   date on them .


I used an exacto knife to cut a small slit below each month to attach the ribbon using the clear glue, leaving about 3 inches or so extra pulled through to the back.  This will allow me to add birthdays if I need to, although they would not be in date order.


 This is my finished Birthday Board.  Even my husband loves it because now he can help remind me.  Tee Hee!!


  I hope you will enjoy making this project as much as I did.  Happy crafting ladies!!              

Until next time Big Hugs and Best Wishes