Saturday, December 10, 2011

Beautiful Poinsettia Tree

This time of year the time just seems to fly by. Before we know it Christmas is only 15 days away and we are behind the eight ball.  Literally trying to juggle all eight at once.  Tee Hee    I really meant to get this post up last week, but as you can tell by my lateness things are not getting any less hectic.
I hope that everyone had as wonderful Thanksgiving as I did.  We enjoyed three of our grandchildren-- Heather with her husband Josh and children Hailey and Zack;  Kristy and her daughter Anna (Kyla was sick); Weston our grandson, plus daughters Terri and Connie for Thanksgiving dinner.  We had such a great time with them.
Now if I can just get everything done I am supposed to for Christmas I will feel pretty good about the New Year fast approaching.  LOL
My cousin Doug Hinkle made his mother a Poinsettia Tree for Christmas this year and I wanted to share with you how he made it.  If you or someone you know is at all handy with a saw and hammer this is pretty easy to make.  Takes lots of Poinsettia's (depends on how tall you want your tree) but well worth it when you see the finished product.

First he built an "A" frame with a circle on top and a square on bottom to stabilize it.
Next he added construction cloth to cover the frame.


Now it's time to begin adding the Poinsettias.  WOW!  Just look at the finished tree with lights on it.
He used a child's table to set this one on so there is plenty of room below to put all of Santa's gifts.  You could use the same concept and make a table center piece..just on a smaller scale.  Hope you enjoy trying this one.

Until next time, Love and Hugs

Friday, November 11, 2011

Sweet Potatoes - Sweet Treats

Hi everyone....I'm a little late with my post this week...my husband had back surgery two weeks ago so things have been a "little" hectic.
Last week my friend and neighbor Lori Ellis gave me some sweet potatoes from her garden.  They are so sweet and delicious compared to the store bought ones.  I used two with dinner last night....mashed them with butter and served them with our Salmon fillets.
Then last evening I got this idea to make some Sweet Potato Muffins with the remaining ones.  So this morning I wrote a recipe for them and set out putting them together.  Wanted to see if they were good enough to share the recipe with you.  Of course, I thought so...Tee Hee...but then my husband tried one, and he said they were really good!  I will apologize for not having a photo tutorial this time.  I will do one next time I make them, which I am sure will be soon with Thanksgiving around the corner.  Here's my recipe:


Bake @ 350 degrees for 28 - 30 minutes.  (or until tester comes out clean)
Recipes makes 6 jumbo muffins.

Whisk together the following dry ingredients  in a medium bowl and set aside.
2 cups flour
2/3 cups granulated sugar
1/4 tsp. baking soda
1 1/2 tsp. baking powder
1/2 tsp. salt
1 tsp. cinnamon
1/2 tsp. nutmeg

In larger bowl combine until smooth ( I used my immersible hand blender for this)
1 egg
1 stick unsalted butter (softened)
1 tsp. vanilla extract
1 tsp. fresh lemon juice
1/3 cup buttermilk
1 1/2 cups cooked and peeled sweet potatoes

To this add the dry ingredients and mix just until  moistened.

Topping:
1 Tbsp. flour
1/4 cup brown sugar
1/4 cup chopped pecans

Mix together and sprinkle each muffin with heaping tablespoon of topping, and enjoy!


I hope you enjoy them as much as we did!  Happy Baking!

Until next time,  Love and Hugs

Wednesday, November 2, 2011

Birthday Board - Never Forget Another Birthday

Have you ever been embarrassed by forgetting a birthday in your family?  Boy I have!  Talk about having a red face and feeling about an inch high.  Tee Hee  Keeping track of all the birthdays makes my brain crazy sometimes. I believe I have found the perfect solution to that dilemma. I ran across this really great idea at The Idea Door  the other day for keeping me on track with family birthdays.  We have 17 great-grandchildren, 8 grandchildren, and 5 children; plus all the cousins and nieces and nephews so this project is perfect for us. 

It's a Birthday Board.....and here is how I made mine.

Materials Needed:
foam board
1/2 yard fabric
embellishments
ribbon 
card stock (variety of colors)
Aleen's Clear Gel Tacky Glue

Tools Needed:
punches -  in your desired shape
exacto knife
scissors
ruler 
chalk pencil or chalk

I started by cutting a 12"x 20" foam board.  I then covered it with fabric affixing it with the clear glue as shown in picture below.


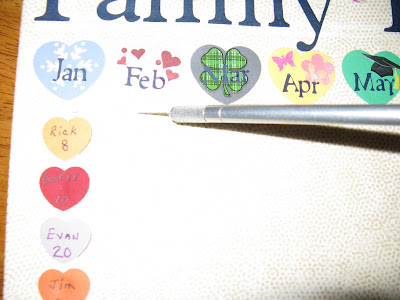
I decided to use hearts shapes for the months and birthdays because I am all about love and family, and all things of the heart <3 .  I used a 1-1/2" heart punch for the months and a 1/2" punch for the individual birthdays below each month. 


Then I embellished each month with things that pertain to  that  particular month,  for example:  I used a pumpkin and a black  cat for October.


I used my Cricut Machine to cut the title lettering for the board.  I used 2" letters.  Before placing the letters,  I  made a chalk line so   that my lettering would be level across board.  I titled my board Family Birthdays.


After I cut all the letters and shapes I glued them to the board using the clear glue.


 I used ribbon to glue the individual hearts with names and   date on them .


I used an exacto knife to cut a small slit below each month to attach the ribbon using the clear glue, leaving about 3 inches or so extra pulled through to the back.  This will allow me to add birthdays if I need to, although they would not be in date order.


 This is my finished Birthday Board.  Even my husband loves it because now he can help remind me.  Tee Hee!!


  I hope you will enjoy making this project as much as I did.  Happy crafting ladies!!              

Until next time Big Hugs and Best Wishes

Wednesday, October 19, 2011

Nostalgia


Nostalgia is defined in Websters Dictionary as a yearning to return home (being homesick).
Evidently this sentiment is not so true for some.  I heard on the Today show this morning that Thanksgiving is defined as "obligatory dysfunctional family get-together", another one I heard this morning as FFF  "Forced Family Fun". I had a good laugh over both of these definitions.

This time of year always makes me nostalgic.  How many of you, like myself, remember waking up on Thanksgiving morning to the yummy smell of turkey baking in the oven?  My Mom would be in the kitchen at 5 a.m. putting the turkey in the oven.  The day before the house was full of the delicious aromas of  pumpkin, mincemeat, and pecan pies baking.

I have so many wonderful memories of Thanksgiving and sharing with family and friends over the years.  When I was growing up we always had a houseful of Aunts, Uncles and lots of cousins (14 to be exact);  plus our family of four children, Mom and Dad  and of course Grandma and Grandpa.

After I got married and moved away from home we made our own Thanksgiving memories. I remember one particular Thanksgiving when we were stationed in Florida near Fort Walton Beach.  Several families of us went to the beach in Destin, Florida and cooked fish the guys caught on our grills.  We had a blast.  It was quite different from the snowy Thanksgivings of my childhood.  No matter where we were stationed we always had a houseful at Thanksgiving.  We invited the young airmen who had no family there.  Those were such great and memorable times.

What are some of your most memorable Thanksgivings?  What is your  favorite family Thanksgiving tradition?  Would love for you to share them with us in the comments section.

What are some of your favorite Thanksgiving dishes?  I grew up with Pumpkin Pie.  How about you?
When we were stationed in Wichita Falls, Texas I came across this recipe in our local newspaper .  It became one of our families favorites.

                                                               Sweet Potato Pie 

Boil one large sweet potato and one small one in jackets until tender.  Run cold water over them and peel.  Mash with a potato masher until smooth.  Add 1 stick butter (room temperature), 2 cups sugar "if it isn't sweet enough it isn't fit to eat" (according to the author of this recipe) 1 teaspoon cinnamon and nutmeg, pinch of salt, 4 eggs (beaten), 1 can condensed milk, undiluted.

Mix well and pour into a 9 inch unbaked pie crust.  Bake @ 325 degrees for 35 to 40 minutes until lightly browned and top is set.


                                                Nanny's Cornbread Dressing

I bake my own cornbread a day or two ahead of time, crumble and let it dry out a little. If I'm having a 20 plus pound turkey.  I bake a 9 x 13 pan of cornbread.

In a large bowl add to the crumbled cornbread,  two stalks of diced celery, 1 med chopped onion, 2 can fresh oysters (chopped),  1 can chopped water chestnuts, 4 eggs (beaten),  2-3 cups turkey broth,; sage, salt and pepper to taste.
Mix all ingredients together and pour into a lightly greased baking dish.  Bake @ 350 degrees, 25 to 30 minutes until golden brown on top  I usually do not stuff turkey with dressing. 
Note:  Depending on the density of your cornbread you might have to adjust the amount of broth up or down.

I hope you enjoy these recipes as much as my family does.  Please share your favorite Thanksgiving recipe with us...

Until next time Hugs and Best Wishes

                     Nanny


Wednesday, October 12, 2011

Don't throw those "sweaters" away.......

Wow! This week has flown by so fast.  Not really sure why.  Maybe it's the fall crispness in the air.  The leaves and the acorns are falling so fast my husband can't keep up with them   I was walking to the garage the other day and got knocked on the head with one of those darn acorns.  OUCH!  I hope that you have all had a good week.

Have you ever wondered what on earth to do with all those outgrown sweaters, or sweaters you've grown tired of?   Well here's some ideas for re-purposing those sweaters.

FIRST is felting  the sweaters and making totes out of them. 100% wool sweaters work the best for these.  Also, try thick merino, cashmere, and alpaca.  If you don't own any of these --thrift shops are a great place to find good buys on them.   These are super easy to make even for the novice sewer.

TOOLS YOU WILL NEED:
*  100% wool sweater (L or X L are good for totes)
*  Washer and dryer
*  Laundry detergent
*  Large needle
*  Strong thread (carpet and quilting thread work best)
*  Sharp scissors (heavy duty ones are best)


Step 1.  WASH - your sweater in detergent, in very hot water,  in your washing machine. (I've found that if I put them in an old pillow case and tie it, it makes less of a mess in your washer.)  Repeat this step if necessary.
Some shrink a little, some shrink a lot; but either way, the individual stitches become more difficult to see and the felted fabric will no longer unravel when cut. 

Step 2.  CUT - Following the pattern below cut off the sleeves and neckline of sweater.  Refold after cutting so the seams of the sweater and the strap openings face front.

Step 3.  SEW - Turn the sweater inside out, and sew across the bottom, 1/2 inch from the edge.  Fold straps, slightly overlapping, in thirds and sew to secure.  Stitch around the bags opening to keep the totes top from stretching.

 Here is a sample of the finished Tote.


If you are an experienced seamstress, here are some other ideas for making purses out of the sweaters.  Some sweaters don't felt up as well as others.  Not to worry though, you can still make some great purses and totes out of them.

First decide the size and shape you want your purse to be.  Then cut your sweater accordingly.  I like to line mine and put pockets inside them.  I look at garage sales and thrift stores for purses that are priced between $2 and $5 each.  I remove the hardware and handles from them and re-use on my sweater purses.  Much less expensive than buying new and I am re-purposing yet another item.

So ladies let your imagination be your guide and create away.  The possibilities are endless.  I've put pictures below of some of my finished purses.  Hope you enjoy seeing them.

If anyone has any suggestions or ideas, please feel free to comment. We will share your ideas on our blog.


This last bag was made and designed by my cousin, Cheryl Beavers.  This colorful sweater was not felted.  Just washed before cutting.  I love the paisley print she used for lining, trim and handles.  So as you see the possibilities are endless.  Let your creative juices flow ladies. 

Hugs and Best Wishes,
                 Nanny


Wednesday, October 5, 2011

Scrap Booking Fever!

Thought for the day:
Smile at everyone you see...you never know what is going on in the other persons life.  You just might be the only smile they see today.

Today I thought perhaps I would talk about scrap booking.  I've always been an avid photographer when it comes to family functions and everyday life.  What I was not good at was dating my photos and journaling them.

My journey into scrap booking actually began about six years ago when my mother-in-law passed away.  Has anyone else ever received a huge box of pictures and/or photo albums or both when a parent or loved one passed away?  That's what happened to my husband and I.  We began looking through the pictures and the albums and my husbands response was repeatedly "I don't recognize anyone" or I have no clue when or where this was taken".  I made a vow right then and there that I was going to leave more of a legacy for my children, grandchildren, and great-grandchildren.

A friend of mine is a consultant with "Creative Memories".  I attended one of her classes and I was hooked.  I decided that I was going to start scrapbooking and journaling all of our pictures.  I do not want to leave the same kind of mess for my family as my mother-in-law did for hers.  So needless to say, I had a huge task ahead of me.  I decided to go back to 1979, which is when my husband and I reconnected after being engaged as teenagers.  Another story, for another time.

I began by doing one year at a time, matting, journaling and embellishing my pages until I was satisfied with them.  It's been a long process, but I am almost current.  I say that with tongue in cheek.  I'm almost finished with 2010.  Then I will be ready for this year.  However, I still have the 90's to complete.  Those were such busy, fun filled years I had a difficult time remembering what we did which year.  I believe I finally have it as near as it's gonna get.  After I finish catching up and am current I will tackle those years.

My husband loves looking at each album after it is completed. He always asks me how I can remember what happened way back then. My response is always I have to do it now while I can still remember.  Someday these albums may be the only memory I have.  Fortunately, for now I have a pretty good memory.

I love scrap booking.....it gives me such a feeling of contentment and satisfaction to see my completed albums.  I hope that someday my grandchildren and great-grandchildren will appreciate them as much as I have enjoyed doing them.  I have actually gotten two of my granddaughters and one of my daughters into scrap booking with me.  I buy my scrap booking supplies from many different venues.  I find that if I determine which pictures I am going to scrap book, then I can decided what embellishments, matting pages, etc. I want to use.  If I don't have a particular embellishment, I go on line and find a clip art that works and print and cut it out.  My son bought me my first Cricut Machine.  I've since passed that one on to Heather and bought a larger one, which I love.

Below are a few pages from my 2010 album I wanted to share with you.  It gives you an idea of the kind of pages I do. My sincere hope is that in sharing my ideas with you, you will take that first step and start scrap booking your pictures.  Good luck and good scrapping!  Have fun, let the creative juices flow.  There are no limits to what you can accomplish if you just set your mind to it.


                                                   My oldest great-grandson getting a lesson with his
                                                      first shave.
 
                                                 This is a memory to cherish forever.  That first bike 
                                                           ride without training wheels!
 
                                            Our little skate board champ..if Bubba can do it
                                                        so can I.
                                         
                                           Dad letting the kiddos get there hands in the thick of
                                                      a mechanics job.
 
                                         Cheerleading for the first graders.  What a blast they had.

                                                 Doesn't this one just speak to your inner-child?


Wednesday, September 28, 2011

Fall is Definitely in the Air...

I just love these crisp fall mornings. Sitting on the deck having a steaming cup of coffee with my sweetie.  Life couldn't be better.  This weather is just right for your favorite soups and stews.

Yesterday I was trying to figure out what to fix for dinner.  I rummaged through my freezer and found some sweet Italian sausage.  This is the recipe I came up with.  I hope you like it as much as we did.  It was pretty tasty I must say.


                                                          Italian Sausage Soup 
            
         Ingredients:
                          3 links Italian sausage                     3 cups chicken stock
                          1/2 chopped onion                           1 can cream of mushroom soup
                          2 cloves minced garlic                     salt and pepper to taste
                          1 rib diced celery                              Cayenne pepper (we like a little kick to ours )                                       6 medium potatoes diced

Remove sausage from casings and crumble.  Brown sausage in large pot, set aside.  Cook diced potatoes in chicken stock until tender.  Meanwhile, saute garlic, onion and celery in small skillet.  When potatoes are cooked add to pot with Italian sausage (liquid included).  Stir in mushroom soup, heavy cream and seasonings.  If mixture is too thick for your preference add additional chicken stock.  Heat on medium heat until bubbly and hot.

This recipe will serve 4 to 6 depending on size of servings.

Note:  I made homemade garlic bread sticks to go with the soup.

 _________________________________________________________________________________

The next recipe I want to share with you is one of my all time favorites.  If you like espresso you will love my recipe for these Espresso Nut Muffins.  The original recipe was in Taste of Home magazine and I tweaked it a little to make it my own. These jumbo muffins are scrumptious!  Serve them warm with a cup of your favorite coffee or hot tea.


                                                    Espresso Nut Muffins


 Makes six jumbo muffins.
                          2 cups flour                                        1 cup strong brewed coffee
                          2/3 cup plus 2 Tbsp. sugar                 3 Tbsp. espresso powder      
                          1-1/2 tsp. baking powder                    1/2 cup canola oil
                          1/4 tsp. baking soda                           1 egg, beaten
                          1 tsp. salt                                             1/2 cup chopped walnuts
                          1/4 tsp. nutmeg                                   1/2 cup chopped dates
                                                                 
                 Topping:
                          1 Tbsp. sugar
                          1/4 tsp. ground cinnamon

Combine the first six ingredients in a large bowl.  In a small bowl combine the coffee and espresso powder.  Be sure coffee is cooled to room temperature.  Stir oil and egg into coffee mixture.  Add coffee mixture to dry ingredients and stir just till moistened.  Fold in walnuts, dates and raisins.
Spray jumbo muffin pan with cooking spray.  Use 1/2 cup measuring cup for each muffin.  Top each with the cinnamon sugar mixture.  Bake at 350 degrees for 25 to 30 minutes or until toothpick comes out clean.  Cool 5 minutes before removing from pan to a wire rack to cool completely.

Note:  I have used chocolate chips in place of raisins.  I've also used chopped bananas in place of raisins and dates.  This makes an entirely different flavor, but just as tasty.  You can make a mixture of powdered sugar and coffee to drizzle on the tops if you like a little more sweetness to them.


Quote of the day:  Advice is seldom welcome; and those who need it most like it the least.  (funny how that happens)  This is a quote from Philip Dormer Stanhope, 4th Earl of Chesterfield, 1694 - 1773

Nanny's thought for the day Life is what you make it.  Fill your life with love, family and friends. "LIVE"  like there is no tomorrow and "DANCE "like no one is watching.


Every now and then I will share a little family story with you.  These grand babies always make me giggle with their little stories.  So here's the first:  One of my granddaughters was having dinner with her two little girls who are  three and five years old.  The five year old said "momma I want to be a school teacher when I grow up" not be be outdone the three year old pipes up and says "momma I want to be a hillwilly when I grow up.  I got quite a laugh out of that one.  You just never know what they will say.

 Love and Hugs,

Tuesday, September 27, 2011

So I had this brilliant idea, well...at least I think it was brilliant. I am going to have a guest blogger once a week, who also happens to be my gramma, we call her Nanny. So let me introduce you all to my Nanny....here goes our first Nanny's Corner:


Hi!  My name is Karen, but everyone calls me Nanny.  I am a wife, mother, grandmother and great-grandmother 17 times.  Wow, never dreamed I would have such a large family. 
Having such a large family has given me so much joy and happiness in my life.  I never tire of having little ones around and all the giggles, and fun we have together.

Since I have retired I have filled my days with sewing, knitting, crocheting, crafting of all kinds, scrapbooking and quilting.  I am in the process of making quilts for all our children. I will then start on the grandchildren.  I am hoping that these will be heirlooms  they will pass on someday.

I was so excited when my granddaughter asked if I would like to add some grandmotherly tips and quips to her blog.   I have now added yet another fun thing to fill my day.  Thought I would share things with you like “Tips of the Day”, recipes and ideas for re-purposing items from your home instead of throwing them out.

Okay so here we go: 

One of my favorite sayings is “ Anything worth doing is worth doing right”.

Nanny’s Tip of the Day:  Don’t forget to check the batteries in your fire alarms.I always do mine in the spring and fall…which reminds me, I better check ours!

With Halloween right around the corner here are some ideas for decorating and making pumpkins:

I saw a really cool idea in a magazine the other day where you paint the pumpkin black first (after you have cleaned out the insides of course) then carve leaves on them.  You use an actual pattern of a leaf from your yard for carving.  It was really beautiful.
                Ladies Home Journal

Another way to make pumpkins is:
Take a brown paper bag  (one you get from the grocery store) stuff it with wadded up newspaper, tie near top to make stem, then squish it down to shape you want. You can come up with some really ghoulish shapes or traditional shapes.  Then you can paint and decorate it any way you desire.  Have fun with it.

    Somedaycrafts
                                Karey Ellen Designs